How to Navigate Your Fat Transfer Recovery Timeline in 6 Steps
What to Expect From Fat Transfer Recovery
Fat transfer recovery follows a predictable biological process, but knowing what to expect at each stage makes a real difference in your results.
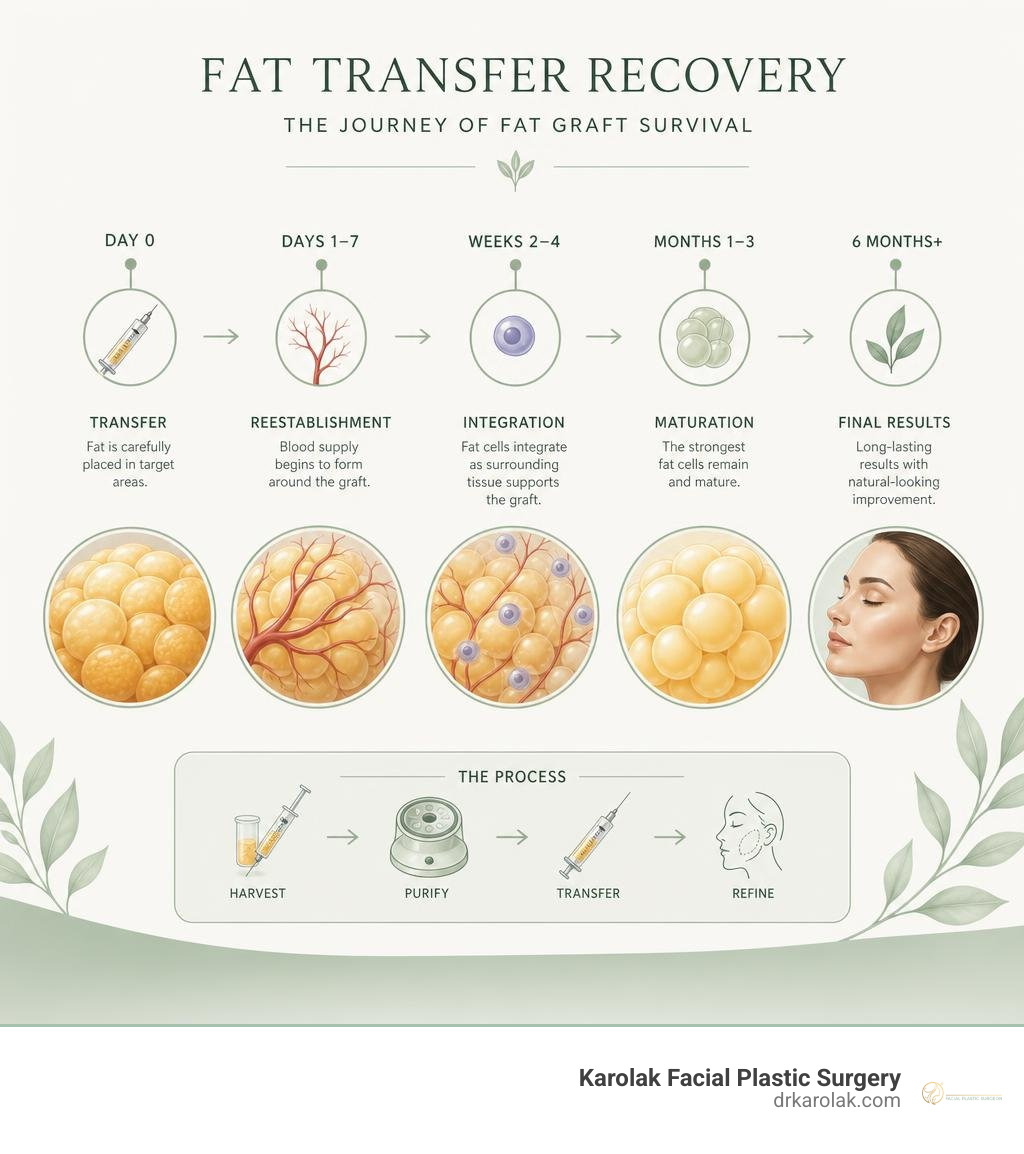
Here is a quick overview of the recovery timeline:
| Stage | Timeframe | What Happens |
|---|---|---|
| Peak discomfort | First 48 hours | Swelling, bruising, tenderness at donor and recipient sites |
| Swelling and bruising | Week 1 | Most visible side effects; rest is essential |
| Returning to non-strenuous work | 7 to 10 days | Bruising fades; light activity resumes |
| Compression phase | Month 1 | Garments worn at donor sites; swelling continues to reduce |
| Fat settling | Months 2 to 3 | Volume stabilizes; some fat is naturally reabsorbed |
| Final results | Month 6 | Surviving fat cells are permanent; blood supply fully established |
On average, 60 to 80 percent of transferred fat survives long term. However, the body naturally reabsorbs roughly 30 to 50 percent of the injected fat during the first few months. That is why your surgeon may slightly overfill the treated area during the procedure.
Most patients return to non-strenuous work within 7 to 10 days. Full, stable results take about six months to appear, once the surviving fat cells have established a new blood supply.
Recovery is not just passive healing. What you do (and avoid) in the weeks following your procedure directly affects how much fat survives and how natural your results look.
I am Mark Karolak, a facial plastic surgeon based in Martinsville, New Jersey, with a focused practice in natural-looking facial rejuvenation including fat transfer recovery guidance for patients seeking subtle, lasting results. In the steps below, I will walk you through exactly what to expect at each stage so you can protect your results and heal with confidence.
The Biology and 6 Steps of Your Fat Transfer Recovery
To truly understand your fat transfer recovery, it helps to look at the procedure through a biological lens. Unlike synthetic fillers, autologous fat is living tissue. When we perform a fat transfer, we are essentially performing a tissue transplant. The harvested fat cells must establish a brand-new blood supply in their new location to survive long term.
Physicians and researchers often refer to Peer’s cell survival theory and the three-zone survival theory to explain this process. When fat is micro-injected into the face, it settles into three distinct biological zones:
- The Survival Zone: This is the outermost layer of the transferred fat. Because these cells are in direct contact with the host tissue, they quickly receive oxygen and nutrients, leading to high survival rates.
- The Regeneration Zone: This middle layer contains cells that are temporarily starved of oxygen (hypoxic) but can survive and regenerate if they receive prompt blood vessel growth.
- The Necrosis Zone: This is the innermost core of the injected fat. If the fat is injected in large clumps rather than delicate micro-droplets, the cells in this central zone cannot access nutrients and are naturally reabsorbed by the body.
This biological reality is why the skill of your surgeon is so critical. By using specialized techniques, such as harvesting with a gentle 2-mm cannula and injecting the fat in tiny, multi-layered droplets, we maximize the surface area contact between the transferred cells and your natural blood vessels.
During the first few weeks, it is entirely normal for up to 30% to 50% of the transferred fat to be reabsorbed by the body. The cells that successfully integrate and survive past the six-month mark will remain permanently. If you are wondering about the long-term behavior of these cells, you can read more about how long does a fat transfer last to understand how they age naturally with your face.
Following structured clinical guidelines on fat grafting aftercare is the best way to support this cellular integration. Let us break down your recovery journey into six manageable steps.
Step 1: The First 48 Hours of Your Fat Transfer Recovery
The first 48 hours after your procedure are all about resting and allowing the newly grafted fat cells to begin adapting to their new environment. During this initial window, discomfort and swelling will peak. You can expect a tight, stretched sensation in the treated areas of your face, along with mild soreness at the donor site where the fat was harvested.
Managing this early stage requires a balance of rest and gentle care:
- Prioritize Rest: Keep your physical activity to an absolute minimum. Your body needs to direct its energy toward cellular healing.
- Manage Discomfort: We will provide you with a personalized pain management plan. Most patients find that any post-operative soreness is highly manageable.
- Avoid Pressure: Do not press, rub, or massage your face. The newly transferred fat cells are highly delicate and can easily be displaced before they anchor.
- Keep Your Head Elevated: Sleep with your head propped up on a few pillows to help minimize the initial rush of swelling.
One of the greatest advantages of our approach at Karolak Facial Plastic Surgery is that we perform our procedures under local anesthesia rather than general anesthesia. By avoiding general anesthesia, our patients completely bypass the post-operative grogginess, severe nausea, and heavy systemic strain that often complicate the first 48 hours of recovery. You will wake up feeling clear-headed, which makes the very beginning of your recovery significantly more comfortable and relaxed.
Step 2: Week 1 and Managing Swelling
As you progress through the first week, swelling and bruising will become more prominent. This is a completely normal inflammatory response as your tissues begin the healing process. The swelling often peaks around day three or four before starting to gradually subside.
You will also navigate the early stages of donor site recovery. Whether your fat was harvested from your abdomen, flanks, or thighs, that area will likely feel tender and bruised, similar to the sensation of a deep muscle soreness after an intense workout.
To manage this phase effectively:
- Engage in Light Walking: While strenuous exercise is strictly off-limits, we encourage you to take short, gentle walks around your home. This light movement promotes healthy blood circulation, which helps clear bruising and prevents the risk of blood clots.
- Wear Your Compression Garments: If we provided a compression garment for your donor site, wear it exactly as directed. This supports the tissue, minimizes localized swelling, and encourages the skin to heal smoothly.
- Avoid Blood Thinners: Continue to steer clear of aspirin, ibuprofen, and certain herbal supplements that can worsen bruising.
For a deeper dive into how the harvesting process affects your overall healing, you can explore the clinical insights on Donor Site Considerations in Fat Transfer: Contour and Recovery to see how donor site care plays a vital role in your journey.
Step 3: 7 to 10 Days After Fat Transfer Recovery and Returning to Non-Strenuous Work
By 7 to 10 days after your procedure, you will begin to feel much more like yourself. The most intense swelling will start to recede, and any residual bruising will transition to a light yellow or brown hue before fading away completely.
For most patients, this is the window where returning to non-strenuous work and resuming light daily activities becomes comfortable. If you work a sedentary desk job, you can typically plan to return to work after 7 to 10 days. By week three, any minor residual bruising can easily be camouflaged with a light application of makeup.
However, there are still a few important boundaries to keep in mind during this phase:
- Driving Restrictions: You should avoid driving for the first few days after surgery, and you must never drive while taking prescription pain medications. Once you are off all pain medications and can comfortably turn your head without stiffness, you can safely get back behind the wheel.
- No Strenuous Activities: Even if you feel highly energized, your body is still actively working to build a new blood supply for the transferred fat. Keep your exercise limited to casual walking.
- Protect Your Face: Continue to avoid sleeping on your stomach or side to prevent accidental pressure on your cheeks, temples, or under-eye areas.
As your facial contours begin to reveal themselves, you can learn more about the nuances of the facial fat transfer procedure to understand how the swelling resolves to reveal a softer, refreshed appearance. For broader context on overall healing expectations, you can also review the Fat Transfer Recovery & Aftercare | Fat Grafting Recovery guidelines provided by the Aesthetic Society.
Step 4: Month 1 and Compression Garments
By the time you reach the one-month mark, your facial swelling will have decreased significantly, allowing you to appreciate the early contours of your rejuvenation. At this stage, your focus will shift slightly toward finalizing your donor site recovery.
If you were instructed to wear a compression garment on your donor site, this is often the period where you can transition to wearing it less frequently or phase it out entirely, depending on your surgeon’s advice. Wearing these garments consistently during the first two to three weeks is essential because they:
- Keep constant, gentle pressure on the harvested area to prevent fluid accumulation.
- Help the skin adapt smoothly to its slimmer contour.
- Provide physical support that makes moving around much more comfortable.
At one month post-op, your tiny incision sites from both the harvesting and the micro-injections should be well-healed. They may appear slightly pink, which is a normal part of the scar maturation process, but they will continue to fade and soften over the coming months.
To ensure you are doing everything possible to protect your results during this transitional month, you can read these helpful tips on Fat Transfer in NYC: 7 Key Recovery Tips for maximizing your long-term fat retention. If you are curious about how these early results translate into long-term volume, you can check out our guide on how long will my fat transfer last to see how the treated areas stabilize.
Step 5: Months 2 to 3 and Watching the Fat Settle
During months two and three, you will watch your results truly begin to settle. This is the stage where the temporary swelling completely disappears, and you are left looking at the actual, living fat grafts.
It is common to notice a slight decrease in volume during this time. Do not worry, this is a completely natural part of the biological timeline. The fat cells that were destined to be reabsorbed by your body are gently cleared away, leaving behind the healthy, vascularized fat cells that have successfully anchored into your facial tissues.
We will schedule regular follow-up appointments with you during this window to:
- Carefully evaluate how the fat is settling and integrating.
- Monitor your incision healing and donor site contours.
- Answer any questions you have about transitioning back to your normal exercise routines.
Understanding this settling phase is highly reassuring. If you want to learn more about how the body processes fat grafts over the first few months, you can read about the journey of Fat Transfer After Weight Loss: Process, Candidates, Preparation & Recovery – Kansas City Liposuction Clinic to see how volume stabilization occurs across different patient profiles.
Step 6: Month 6 and Beyond for Final Results
At the six-month mark, we celebrate your final, stable results. By this point, the surviving fat cells have fully established a permanent blood supply. They are no longer just temporary visitors, they are a living, integrated part of your facial anatomy.
These permanent fat cells will behave exactly like the rest of the fat cells in your face. They will age naturally, softening your features and maintaining a beautiful, youthful volume that synthetic fillers simply cannot replicate.
Because these results are permanent, choosing a highly skilled surgeon who understands the delicate contours of the face is paramount. If you are ready to explore how this procedure can restore a natural, rested youthfulness to your appearance, search for a trusted provider of a fat transfer near me to schedule a personalized consultation.
How Recovery Varies by Treatment Area
While the general biological timeline of fat grafting remains the same, the actual recovery experience can vary significantly depending on where the fat is placed.
Because our practice is dedicated exclusively to facial plastic surgery, our patients undergo facial fat transfers targeting areas like the cheeks, under-eyes, temples, and smile lines. Facial fat transfers require a much smaller volume of fat (often only 10 to 30 mL) compared to body procedures like breast or buttock augmentations, which can require hundreds of milliliters of fat.
This difference in volume has a massive impact on your recovery:
- Facial Recovery: Because we only need to harvest a very small amount of fat, the liposuction donor site is tiny, resulting in minimal post-operative soreness and a very quick donor site recovery. The swelling in the face, while visible, resolves much faster than the extensive swelling associated with large-volume body procedures.
- Body Recovery: Procedures like breast fat transfers involve managing larger donor sites and navigating more extensive post-operative restrictions, such as wearing specialized surgical bras for several weeks to protect the newly grafted areas.
To help you visualize these differences, here is a simple comparison of recovery times and care requirements:
| Recovery Detail | Facial Fat Transfer | Breast Fat Transfer |
|---|---|---|
| Average Volume Transferred | 10 to 30 mL | 200 to 400 mL per breast |
| Primary Donor Site Care | Minimal compression for 1 to 2 weeks | Moderate compression for 2 to 6 weeks |
| Return to Light Work | 5 to 7 days | 7 to 14 days |
| Specialized Aftercare | Sleep elevated; avoid facial pressure | Wear surgical bra; avoid sleeping on chest |
If you are in the Tri-State area and want to learn more about facial-specific rejuvenation, you can read about finding a specialist for a facial fat transfer near me new jersey to see how we tailor our techniques to the delicate structures of the face. For those interested in comparing facial recovery to the recovery path of larger body procedures, you can review the details on Fat Transfer Breast Augmentation Recovery Time to see how volume changes the recovery landscape.
Essential Do’s and Don’ts to Maximize Fat Survival
To get the absolute best results from your fat transfer recovery, you must actively protect the delicate, newly transferred fat cells while they work to establish a blood supply.
Here is a quick checklist of the most important do’s and don’ts to keep in mind:
- DO Sleep on Your Back with Your Head Elevated: Use a few comfortable pillows or a wedge pillow to keep your head propped up. This simple habit uses gravity to reduce facial swelling and prevents you from accidentally rolling onto your face in your sleep.
- DO Prioritize Protein and Healthy Fats: Your healing cells need high-quality nutrients to rebuild. Incorporate healthy fats like avocados, nuts, salmon, and olive oil into your meals, and ensure you are getting plenty of protein to support tissue repair.
- DO Drink Plenty of Water: Staying well-hydrated is essential for healthy blood circulation, which helps deliver oxygen and vital nutrients directly to your healing face.
- DON’T Massage or Rub Your Face: It can be tempting to touch your face as it heals, but any physical pressure can disrupt the delicate new blood vessels trying to connect with the transferred fat cells, leading to increased reabsorption.
- DON’T Smoke or Use Nicotine Products: Nicotine is a powerful vasoconstrictor, meaning it shrinks your blood vessels and drastically reduces the amount of oxygen reaching your face. Smoking is one of the leading causes of fat graft failure.
- DON’T Engage in Strenuous Exercise: Avoid high-impact workouts, heavy lifting, or intense cardio for at least one month. Burning too many calories or placing physical stress on your body can cause your body to burn off the newly transferred fat cells before they have a chance to settle.
By strictly following these simple guidelines, you give your body the perfect environment to maximize fat graft survival. If you want to learn more about protecting your investment and ensuring your results stand the test of time, you can read our detailed guide on how long does a fat transfer last new jersey for localized care tips.
Frequently Asked Questions About Healing
When should I call my surgeon after a fat transfer?
While overall complication rates for fat transfer are relatively low, with major and minor complication rates averaging 10.9% and 16.7% in clinical studies, your safety is always our highest priority. You should contact us immediately if you experience any of the following warning signs:
- A fever over 38°C (100.4°F), which can be an early sign of infection.
- Sudden, sharp, or rapidly worsening pain at either the facial recipient sites or the liposuction donor site.
- Excessive, continuous, or foul-smelling fluid leaking from your incision sites.
- Spreading redness, warmth, or severe tenderness around your face or donor area.
- Shortness of breath or sudden chest pain, which require immediate medical attention.
For more information on post-operative safety and what to look out for, you can read the clinical safety guidelines on Fat Transfer Recovery | Fat Grafting Recovery Time to help you monitor your healing with peace of mind.
How do weight fluctuations affect my long-term results?
Once the transferred fat cells successfully integrate into your face and establish a blood supply, they behave exactly like the rest of the natural fat cells in your body. This means they are highly sensitive to weight changes:
- Weight Gain: If you gain a significant amount of weight, the transferred fat cells in your face will expand, which can alter your facial contours.
- Weight Loss: If you lose a significant amount of weight, these cells will shrink, which may reduce the youthful volume we restored during your procedure.
To protect your beautiful, natural-looking results, we highly recommend maintaining a stable, healthy weight post-surgery. Ideally, you should be at or near your target weight before undergoing the procedure.
What role do compression garments play in donor site healing?
Compression garments are essential for a smooth donor site recovery. Even though we only harvest a small amount of fat for facial procedures, the space where the fat was removed needs support to heal beautifully. Compression garments help by:
- Minimizing localized swelling and bruising.
- Preventing fluid from collecting in the empty space left by the harvested fat.
- Supporting the skin so it can contract smoothly over your new, slimmer contours.
- Providing physical comfort and reducing soreness when you move around.
Conclusion
Navigating your fat transfer recovery is a journey that requires patience, gentle care, and a clear understanding of the biological healing process. By knowing what to expect at each step, you can actively support your body as it works to anchor and nourish your newly transferred fat cells.
At Karolak Facial Plastic Surgery, we are proud to serve patients throughout the Tri-State area, including Monmouth County, Wall Township, and the Jersey Shore. Our medical practice is built on a foundation of extensive experience, having performed over 3,000 natural-looking facelifts and facial rejuvenation procedures.
Our unique signature is performing these advanced procedures entirely under local anesthesia. By avoiding general anesthesia, we provide our patients with an incredibly safe, comfortable, and clear-headed recovery experience from the very first hour.
If you are ready to take the next step toward a naturally refreshed, youthful appearance, we invite you to explore our advanced surgical procedures fat transfer options and schedule a personalized consultation with us today.